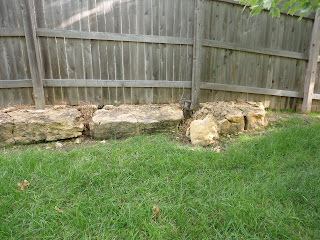
I get so many questions from homeowners who have crumbling, native limestone retaining walls. Usually we call this "the crumbling, yellow crap rock" (sorry about the technical jargon)! Many of these walls are about 20 years old and were constructed by the contractors who built the house. The rock was probably the ledge rock that was dug up from the excavation of the house site. The walls vary in size and scale, but usually the worst ones are large block- approximately 3' H and 6-8' W, 3-4' D. The blocks tend to be very large and the stone has gotten crumbly over the years, endangering the yard, perhaps a patio or a slope that was retained.
Some examples of the walls I'm talking about:
 |
| Wall #1 |
 |
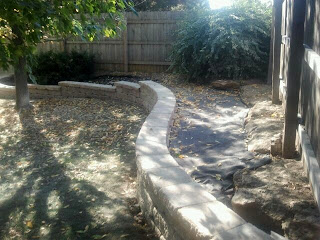
| Wall #2 |
 |
| Wall #3 |
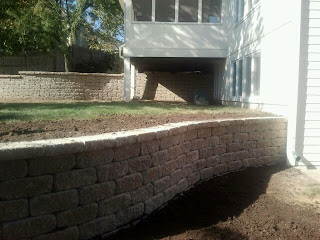
As you can see, these are various sizes and conditions. But they all pose issues. Many homeowners want the walls removed completely. We've found that this actually takes more labor and isn't as efficient. In all these cases above, we opted to remove as much rock as we could (without dislodging the retained soil above it or that FENCE in #2) and simply build in front of the wall. It may surprise people to know that the existing wall is almost totally covered up and the new wall can have a dramatically more pleasing shape. Here are some shots of these walls after they were "replaced" with wall block (Versa-lok in these cases):
 |
| Wall #1 replacement |
 |
| Wall #2 replacement, view A |
 |
| Wall #2 replacement, view b |
 |
| Wall #3- see other walls in background |
Let me say again: the crumbling limestone rock is still back there; pared down but still there!
Walls 2 and 3 are the same backyard/ homeowner. She had three deteriorating walls in her back yard and we replaced all of them. Derek, our supervisor on this job, does a great job of creating softly curving walls that are just beautiful to look at (as well as being very, very sturdy). Derek and his crew got under the porch with a power drill and chisel to chisel out some of the existing stone and get it down below grade so that the wall would totally cover up the old rock. On top of the lower two walls, we put soil and seeded. On the upper, with the fence, we added weed mat and river rock. This way she doesn't have to weed up there! She chose Versa-lok Flint Hills Tan as her color choice. The block is the most cost effective, sturdy, good looking type to use.
Now, this is a big investment for a homeowner. Here are some questions to ask your contractor: what type of block are your bidding out to use? Can I make changes to the block/ choose color and does that affect price? Are you putting in drain tile so that water can move through? (See the wall #2, view b)? What are you putting back on top (soil, grass seed, sod, rock, etc)? Is this figured in to the estimate? Have you included fixing the damage to the sod in the estimate/, and/or any changes to the sprinklers that might be needed? (This is so important to ask!) As with all walls, there is a fair amount of gravel that is put underneath and behind the wall to stabilize it and allow freeze/thaw and water to move through. You might double check that the contractor is including this! Any reputable company will. But you want to weed out the fly by night characters!! Call us if you have any questions.


great post
ReplyDeleteI wanted to thank you for this in your liking ensnare!!
ReplyDeleteI particularly enjoying all tiny little bit of it I have you ever bookmarked to check out delivered stuff you pronounce. Hardscapes Kansas City MO