Lawrence Landscape is a full-service landscape company. We provide design services, landscape maintenance, irrigation and drainage solutions, as well as gorgeous hardscaping concepts! Midwest Custom Pools, our sister company, offers full service custom pool design, installation and maintenance.
Monday, May 16, 2011
The boxwood leaf miner!!
Just thought I'd start off with a little "ewwww" factor. This is about the Boxwood Leafminer. We believed that boxwoods were almost pest-free, even pest resitant. Well, this last week, I discovered at a client's house that all of her 15 boxwood were infested. !! This pest isn't unheard of in our area but is fairly rare. As far as I can see, the hort department at KSU doesn't have a common pests post on it. (That's saying something)
This image is from the Clemson Extension website. It has detailed information on the Leafminer, as well as how to handle it. I believe that a systemic insecticide would be adequate at this time of year BUT if you don't identify that you have it, your bush is a goner!
How to figure it out: are your Boxwoods yellowing? Looks like winterkill? Instead of assuming it is, look for the following signs: chlorotic leaves. Means you can see the veins in the leaf and they are yellowing in the margins. Engorged or puffed up leaves... this is the wriggly larvae inside!! Also look for clouds of flying insects around your affected boxwood. These are the adults, hatched out.
Don't despair... boxwood are still an awesome shrub for the home garden. They even withstand the ever-present walnut tree! They are a wonderful shrub that tolerates low-light to full sun levels, deals with clay soil well, has few pests and is hardy in our temperatures!
If you think your boxwood or any other shrub looks sickly, don't wait. Give us a call and we will come help you diagnose your plants!
Friday, April 22, 2011
Wednesday, April 13, 2011
Our first Pool Blog!!
[As a preface, this was written by our pool guru Bryan Handy. Have questions on your pool, want a pool? Give him a call: 785.423.5868}Why salt?
I get asked this question a lot: Is a salt pool better than a chlorine pool? Well, let's try and answer that question.
Chlorine comes from one of the most abundant sources in the world, salt or sodium chloride. But we all know that chlorine is not good for us. The Germans even used it as a weapon in World War I. Chlorine is one of the most produced chemicals in the world and can be found almost everywhere. It's found all around your pool too, not only used as a disinfectant for your pool but also found in your pool plumbing PVC (poly vinyl chloride). [**Also, you never want to mix chlorine and pool acid (muriatic acid) as it makes a very dangerous gas.] With that being said, chlorine does a very good job. But if I had a choice between a chemical that can be potentially dangerous and one that has no danger at all, I know which one I would choose for my pool. It would be salt.
Now, you ask, how does a salt system work? It takes sodium chloride (salt), and electrically modifies it to a chlorine gas. Is it just producing chlorine anyway? Yes, but in a more controlled environment and there is no more handling chlorine. Also, it is produced in a smaller quantity. So the exposure to the chlorine is much less and more to the saltwater, which is better for your body and clothes. Yes, chlorine is bleach and will fade your swim suit. You will also find that your chemical cost will go down as salt only leaves the water due to splash out, backwash and draining/ filling your pool. A bag of salt cost anywhere from $6.00 to $8.00 dollars, where a bucket of chlorine tabs can cost anywhere from $22.00 to $150.00 dollars. So, even if you have to add 2 bags of salt through the year, you're still ahead on cost. I would rather have a bag of salt sitting in my garage or equipment room then a bucket of chlorine.

Salt systems are also very easy to install on any system. They even have them now that require a small hole drilled in a pipe and a outlet to plug it into. So installation is very simple but I suggest having a pool professional do the install for you.
It will take a lot of salt when you install a salt system. The salt in the water will taste about the same as a tear drop, so it is not very strong. There is a myth about salt that it's maintenance free; this is not the case. Nothing about a pool is maintenance free so don't get caught up in that myth! Salt systems do cut down on the maintenance but you still have to check your chemicals every week. You also have to clean the salt cell once a month or when the salt system asks for it to be done. This is not a feature on all salt systems. Ask your pool professional for assistance on this if you have never attempted it. It will involve taking the salt system off and using a muriatic acid solution to clean the blades. They get a build up on them, even the so called "self cleaning" ones still need to be cleaned, but not as often.
So to wrap up- why salt? Well, it is healthier for you and your body, you don't have to
handle a potentially dangerous chemical, and you will save money in the long run. As an added benefit, your water will have a different sparkle to it. A salt system is a great addition to any pool above ground and in ground.
Tuesday, April 5, 2011
Tree Farm progress
| The fire pit, nearing completion. The vista, as is. |
| Royal Raindrops Crabapple, budding out. |
Our long range plan is take our design clients to the farm, so they can see and feel samples of stone, shrubs, flowers and trees. They can see how their designs will look and get an idea of the level of our craftsmen. Visit our website for hours of the tree farm and the location. Also, Mike has a (mostly) complete list of trees available on our website as well. You can start to make a wish list and then come in to consult any of us on the wisdom of your choices! (ha ha) I can't say this enough but we have bulk mulch, compost, rock for sale to the public. You can have us deliver or you can pick it up yourself (for smaller amounts). It is fairly economical- check the site for prices as well!
Enjoy this spring! The redbuds are about to burst...
Thursday, March 31, 2011
The sticky subject of weed mat...
(Another post by Glen...)
Controlling weeds has been a problem since the Garden of Eden… About 25-30 years ago, many years after the days of Adam and Eve, weed barrier fabric was introduced to the landscape market. It was, of course, billed as the “solve all” for all weed problems in planting beds. This new weed barrier fabric had the distinct advantage of allowing the water to actually get to the plant roots while stopping most weeds from coming up. At the time, the main material used in planting beds was some form of gravel, lava rock, or big chunks of pine bark placed on top of a layer of black plastic. Therefore, this weed fabric was a much needed improvement over the black plastic that was the industry standard. The black plastic seemed to work very well but it got holes in it when you walked on the gravel and the weeds always found the holes. Also, this black plastic was not then and is not now suitable for planting! The new fabric was really a very good product and still works very well under gravel, lava rock and such materials.
Then came the guy that invented the use of wood mulch, rumor has it he was related to the guy who started bottling water and selling it for the same price as sodas. Not sure who this guy was, but before about 25 years ago all the bark that was stripped off of logs during processing was a waste product and was pretty much wasted! Suddenly, this mulch product started taking over the market for planting beds. It was cheap, good for the plants and soil; and for the landscaper, it became “reoccurring revenue”. (You are supposed to refresh, replace your mulch every year or so)
Landscaper bright idea: This new “weed barrier fabric” would be great to put under mulch, would control the weeds and life will be great… wrong! After about a year or two we realized that the weeds were actually growing on top of the weed barrier fabric! The properties that made the mulch good for the plants, mainly that it decomposed and improved the soil, also provided the perfect “potting soil” for weed seed to germinate. The mulch that did not blow away, exposing the weed barrier fabric, turned into the organic matter but never really got down to the soil to help the plants. So we still use weed barrier fabric; in fact, do not put gravel down without it. But do not use it under mulch! We typically use a pre-emergent herbicide when we use mulch. Put it down every season, and then spray the weeds when they are small enough to “melt” away. After you break the cycle of the weeds reseeding themselves (and control the weeds in the lawn), the mulch works very well without the weed barrier fabric.
Friday, March 25, 2011
Common Landscape Questions.... Edging
We're going to be answering some questions we get everyday- hopefully providing answers for you. Ask us, either on the blog or Facebook, if you have questions we haven't touch upon!
Edging
(This was written by Glen Westervelt, co-President of Lawrence Landscape)
Please note: we are in the midst of becoming avid bloggers (watch us blog, watch us blog)! But we haven't managed to have the most riveting photos, YET. If you are a customer and have a great landscape pic of your yard, let us have it! Send it, post it to facebook. We want to get it out to the public the kind of work we do...
Edging
What is a good kind of landscape edging?
If you could invent the perfect landscape edging you would probably never have to work again.
Natural Edging: This is where the edge between the turf and planting bed is cut down 3-4” and then tapered back into the planting area. This creates a pocket to hold the mulch in the bed.
Works great but needs to be maintained by trimming with a string trimmer and really should be re-cut with a shovel when ever mulch is added to maintain the “pocket” as well as keeping a clean edge and neat transition between the turf and planting bed.
Plastic edging: This is commonly the 4” black plastic edge with the ¾” black tube showing between the turf and planting bed.. It has a nice clean look when installed properly but, as is common with most edging, it will tend to “frost heave” during the freeze-thaw cycles (common in the Kansas weathers), then get hit by the mowers. If it does frost heave, you are stuck with pulling up all the edging and re-digging it. If you don’t, it will become mower bait.
Most of the problems with plastic edging are due to installation problems and purchasing the wrong product. Don’t purchase plastic edging that has been rolled up so it is easier to ship from China! Y ou will never get it into the “sexy curves” you need to make it look great; instead it will look wavy and really quite bad. Installation is also a problem. The plastic tubing should be the only thing you see after installation. You should not see any of the ”vertical web” of the edging. You should be able to run the edge of the mower along it without risking damage to the edging. It is edging- not a mulch retainer! The ability to retain the mulch should come from the “pocket” created… see Natural edging above. The other key that seems to help with the “frost heave” is to drive the edging stakes (...yes you should have steel edging stakes… and no they probably did not come with that “roll of edging”) These stakes should not be driven vertically thru the lip at the bottom edge of the edging. We have found that if you drive these stakes into the vertical web of the edging and drive them horizontally it will help with the frost heave problem (noone will propbably tell you that in the directions but it is true). Not sure how a piece of black plastic really fits into the “natural landscape” but some people like the look…
Steel edging: Typically made of 1/8”-1/4” x4” strap iron; usually green with pre punched stake pocket. You can also get aluminum. Has some of the same problems with “frost heave” but is generally easier to get back in the ground as you can pick muddy day and walk along and tap it back down with a sledge hammer or tamper. It does make a nice clean edge, nice sexy curves, and you really don’t see it as it is only 1/8" to 1/4" thick. It does have a disadvantage over plastic is that it does not bend vertically very well, in fact it does not bend vertically at all! So if you are trying to run it thru a uneven area it does not work very well for obvious reasons. It can be kind of dangerous in “kid” areas, as it does not have any give if anyone should fall on it. I have also heard of dogs cutting the web of their feet on it. I like it in many situations… but again, not a perfect solution for everywhere.
Stone edge: I love the way it looks, but it is more expensive, needs to be string trimmed and it also moves around with the frost. But since it is natural, it still looks good with very little adjustment. This type of edging has some advantages as it does have some ability to retain mulch depending upon how large the stone is. Takes more labor to install since it needs to be dug in, not just laid on top of the ground. Key here is to spend the money on stone that is cut or split for edging. Good long term choice, and good long term investment. Consider it like buying a fine antique.. it is real and very old!
Brick edge: Good formal look, can be laid on edge in a saw-tooth pattern or laid flat so you can mow over the top. You will get grass coming up in the cracks, so you will be doing some string trimming or training your goat to only eat the grass in the cracks! “Round Up” works well, unless you pick a windy day (then you will have bigger problems). Costs more that steel or plastic… another good choice in the right application.
Modular Block edging: There are several good choices this modular concrete edging; this means precast concrete that fits together. There are many retaining wall caps or smaller wall block that will work but some are just really ugly. There are also some nice ones. I prefer the tumbled blocks or edging stones that look more natural and come in some nice colors. So I think they are a good choice for a lot of situations. Again you have to dig them in. Don’t just leave them on top of the ground! This is really a landscape taboo and annoys me. Do it right- it takes some work or just call Lawrence Landscape. (Duh!)
Some other considerations" Don’t put the edging in higher than the siding on your house or you will create a dam or a “Damn” when you are sucking the water out of your carpets in the basements.
Wednesday, March 16, 2011
Ah, Mulch- the nitty gritty stuff
Did you know that we carry bulk mulch, topsoil and compost at the Tree Farm? We can deliver it to you and your garden! We charge $50 per delivery trip. We don’t have the capacity to combine types of mulch/ soil in one trip.
Prices per cubic yard: $28, $35, $35
One cubic yard covers approximately:
100 sq ft= 3"
150 sq ft=2"
300 sq ft= 1"
Our soil and compost:
Pulverized Top Soil
Ton= $40.00
.5 ton= $30.00
Compost
Cu yd= $45.00
.5 Cu yd= $25.00
Instructions for mulching in your yard
It’s that time of year. Time to clean out the debris; the leaves, the dead, the limbs and twigs. It’s also time to replace mulch. Mulches are materials placed over the soil surface to maintain moisture and improve soil conditions. Mulching is one of the most beneficial things a home owner can do for the health of a tree. Mulch can reduce water loss from the soil, minimize weed competition, and improve soil structure. Properly applied, mulch gives your landscape a neat, tidy appearance too. Mulch must be applied properly; if it is too deep or if the wrong material is used, it can actually cause significant harm to trees and other landscape plants.
Types of Mulch- what to use, why and where
Mulches come in two major types: inorganic and organic. Inorganic mulches include various types of stone, lava rock, pulverized rubber, fabrics, and other materials. Inorganic mulches do not decompose and do not need to be replenished often. On the other hand, they do not improve soil structure, add organic materials, or provide nutrients. As plant specialists, horticulturalists recommend and prefer organic mulches in vegetable and garden beds. Inorganic/ rock mulches are great for drainage areas, near the house to minimize splashback and in beds that are not meant to grow plants.
Organic mulches include wood chips, pine needles, hardwood and softwood bark, cocoa hulls, leaves, compost mixes, and a variety of other products usually derived from plants. Organic mulches decompose in the landscape at different rates depending on the material and climate. Those that decompose faster must be replenished more often. Because the decomposition process improves soil quality and fertility, many arborists and other landscape professionals consider that characteristic a positive one, despite the added maintenance.
Organic mulches include wood chips, pine needles, hardwood and softwood bark, cocoa hulls, leaves, compost mixes, and a other plant matter. Organic mulches decompose in the landscape at different rates depending on the material and climate. Those that decompose faster must be replenished more often. Because the decomposition process improves soil quality and fertility, many arborists and other landscape professionals consider this a POSITIVE, despite the added maintenance.
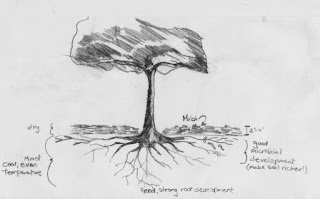
We suggest that when you mulch trees you follow these rules. Yep- rules! Do not make a mulch volcano around your tree trunk. This is when the mulch is piled up 6 inches or so directly touching the trunk. Think of making a mulch donut instead! Keep the mulch low (about an inch) around the base of the tree- expose the trunk flare (where the base of the tree and roots meet). Then make a nice, wide donut about 2-4” deep out to the dripline of your tree or whatever is feasible. The dripline is width of your tree canopy. “Mulch wide- not deep” say the professionals!
Subscribe to:
Posts (Atom)


